Search This Blog

Translate

Monday, October 15, 2012

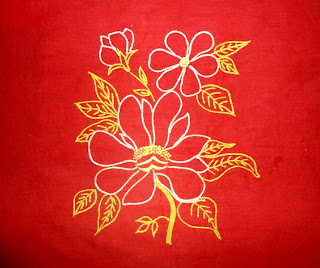
Free Hand Embroidery Pattern---Flower Bunch


Stitch Suggestions:

Long and short for the flower petals
Satin or French knots for the flower center.
Outline stitch and French knots for the stamen 
Satin for the leaves
Long and short for the buds of another type of flower, and satin for the top part of those buds
Outline stitch for the stems

Sunday, July 15, 2012

Free Hand Embroidery Pattern---Flower and Leaves


Hi friends,

Today I am sharing another embroidery pattern with you all. This can be used as a corner design. I guess you will get a lot of ideas for embroidering this design. It will look great if simply outlined in chain stitch or you can use filling stitches such as long and short for the flower and satin for the leaves.


This design can also be repeated and used as a center design on table cloths, center pieces, and table mats.


Floral motifs have always been at the heart of embroidery traditions across cultures. They symbolize growth, beauty, and creativity while offering endless opportunities for personalization. The decorative floral pattern shown above is a perfect example—balanced, symmetrical, and versatile enough to be used on both home décor and apparel.


Why This Design Works

This pattern brings together clusters of flowers and leaves arranged in a cross-like composition, creating a sense of harmony and symmetry. It’s ideal for projects where you want to make a strong, elegant statement.

  • Symmetry: The mirrored layout ensures a polished and professional look.

  • Versatility: Works beautifully as a central motif on table linens, cushion covers, wall hangings, or even on the back of a kurta or blouse.

  • Adaptable: You can stitch it in traditional bright colors, pastel shades for a soft look, or monochrome for modern minimalism.


Suggested Stitches

To make this floral design truly shine, here are some stitch ideas:

  • Stem Stitch/Backstitch: For outlining the leaves and stems.

  • Satin Stitch: Perfect for filling in the flower petals.

  • Lazy Daisy Stitch: A natural choice for smaller leaves and petals.

  • French Knots: Ideal for flower centers or to add decorative accents.

  • Long and Short Stitch: To give shading and a realistic look to larger petals and leaves.


Color Palette Ideas

  • Traditional Vibrance: Reds, pinks, and yellows for flowers, with lush greens for the leaves.

  • Pastel Charm: Soft lavender, blush pink, and mint green for a calming look.

  • Monochrome Elegance: Use a single color thread, like navy or gold, to highlight the intricacy of the design.


Tips for Stitching Success

  1. Start from the center flower and work your way outward to maintain balance.

  2. Use an embroidery hoop to keep your fabric tight and the lines neat.

  3. Experiment with different thread thicknesses to add texture and dimension.

  4. If you’re new, try working one quadrant first before completing the full symmetrical design.

Final Thoughts

This floral embroidery design is timeless, versatile, and full of potential. Whether you want to embellish home linens, create a stunning piece of wall art, or elevate your wardrobe, this symmetrical pattern will add elegance and charm to your project. It’s a design that invites creativity while being simple enough for embroiderers at any skill level.


Tuesday, July 10, 2012

Free Hand Embroidery Pattern --- Bird on a Tree Branch


Hi Friends,

Here is a new embroidery pattern. This little birdie pattern can be used especially for redwork. However, you can use it for other types of embroidery or fabric painting.

There’s something timeless about the image of a bird perched quietly on a branch. It evokes stillness, curiosity, and the gentle rhythm of nature. This embroidery pattern—featuring a single bird in profile, nestled among leafy twigs—is a celebration of that quiet beauty, rendered in thread and imagination.

Whether you're a seasoned stitcher or just beginning your embroidery journey, this pattern offers a canvas for creativity.


Techniques to Try

This pattern is perfect for experimenting with a mix of stitches:

  • Backstitch or stem stitch for clean outlines
  • Long and short stitch to add feather texture and shading
  • Satin stitch for smooth leaf surfaces
  • French knots for eyes or berry embellishments

You can also add dimension by layering threads or using a mix of matte and glossy floss.


Thread Color Suggestions

Bird

  • Body and Wings:
    • Slate Gray or Charcoal for a natural look
    • Indigo or Deep Teal for a more stylized, elegant bird
  • Beak:
    • Golden Yellow or Burnt Orange for contrast
  • Eye:
  • Black with a tiny dot of White for a glint

Tree Branch and Leaves

  • Branch:
    • Chestnut Brown or Dark Walnut
  • Leaves:
  • Olive GreenSage, or Emerald depending on the season you want to evoke
  • For a whimsical twist: try Dusty Rose or Muted Lavender for the leaves

Background Accents (Optional)

  • You could add a soft wash of Sky Blue or Pale Peach behind the bird to make it pop
  • Or stitch a few blossoms in Soft Pink or Cream for a springtime vibe


A Moment of Stillness

In a world that moves fast, embroidery slows us down. As you stitch each feather and leaf, you’re not just creating art—you’re capturing a moment of quiet observation. A bird on a branch isn’t just a motif; it’s a reminder to pause, breathe, and notice the beauty perched right in front of us.


Personalizing Your Piece

One of the joys of embroidery is making a design your own. Consider:

  • Adding blossoms or berries to the branch
  • Incorporating a soft background wash with watercolor or fabric paint
  • Framing it in a hoop with a rustic ribbon for display

This pattern also makes a lovely gift—especially for nature lovers, birdwatchers, or anyone who appreciates handmade charm.


Please let me know if you use this pattern in any of your projects. I will be happy to post the pictures of your project here on my blog. I have given my e-mail address in my profile. Have a nice day!

Happy stitching!
Flora

Monday, July 9, 2012

Progress on Doily and Neck Design


I have made a little progress on the doily and the neck design projects. I am doing both the projects simultaneously, so that I could make some progress on both. The center flower on the doily is almost finished (but I am having trouble embroidering on the satin fabric), and in the neck design, I am focusing on the blue flowers, hoping to finish them today or tomorrow. Here are the pictures.


Have a happy Monday and a great week ahead!


Thursday, July 5, 2012

Kashmiri embroidery

During my trip to Shimla last month, I bought two kameez fabrics. One of these has hand embroidered flowers on the front and around the neck. Could you find the type of embroidery done on this Kameez?

I think most of the readers from India will easily identify it. It is called Kashmiri embroidery or Kasmiri Kashida. Generally, in Kashmiri Embroidery, the whole design is done with a single stitch. It is one of the specialties of Kashmiri embroidery. The design shown in the image is done only with chain stitch. Can you believe it?

Flowers and paisley designs are very common in Kashmiri embroidery. Although I already own some shawls and kameezes decorated with Kashmiri embroidery, I am always attracted to this embroidery wherever I see it.


Can you see how intricate are the design and the embroidery? I like the pastel colors used in this design. I guess the entire embroidery is done with variegated threads. My blogger friend Deepa has blogged about Kashmiri embroidery here.

Another Kameez fabric is jute cotton blend with Resham embroidery on it. Resham embroidery is nothing but soft shading or long and short embroidery. Here it is machine embroidered. I love the colors in this embroidery too. Actually, I bought this fabric just for the color combo and of course it has floral designs.


Monday, June 25, 2012

One Finished Project And Five Unfinished Projects


Hi friends! Sorry for being missing in action over the past three months—I was away on a long vacation. Since I was traveling most of the time, I couldn’t work on any embroidery or sewing projects, nor did I get the chance to update my blog or visit yours.

Once I returned, I decided to take stock of my unfinished projects before starting anything new. To my surprise, there were six in total! I made a promise to myself to finish them all before beginning a fresh project. So far, I’ve managed to complete one out of the six.


Finished Project:

Cushion cover with embroidered flowers

Unfinished Projects:

1. Embroidered Doily:

2. Kameez neck design:


3. Pillow cover with embroidered roses:


4. Embroidery on a silk sari:


5. Embroidery on a crape sari:


All the unfinished projects except the last one involve long and short embroidery. This is one of the reasons for the delay. Also, I could not spend more time on embroidering for the past one year due to various reasons. Now, as I have got more time to spend on embroidery and sewing, I have determined to complete these projects that I have been keeping on hold for a long time. I will update you on the progress of these projects.

Now, I am starting to visit all your blogs. Have a lovely Monday!

Monday, February 20, 2012

Neck Design Project Update


Here are some photos of the neck design I am embroidering now. I finished the big pink flower at the bottom of the design and now am moving on further upward. But it doesn't look like more progress, does it?


Friday, January 27, 2012

Embroidered Neck Design---Progress


Exploring Long and Short Stitch Variations in My Neck Design

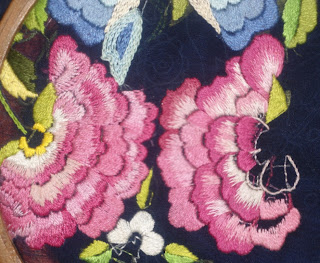
This is my progress so far on the neck design! I’ve been slowly bringing the floral motifs to life, and as you can see, the two large pink flowers are finally taking shape. Each time I sit down to work on this piece, I’m reminded why I love embroidery so much — every single stitch adds dimension, personality, and a story of its own.

Now, if you take a closer look at the two flowers, you might notice a subtle difference between them. Can you spot it? Both are worked in long and short shading, but the technique I used for each flower is slightly different — and that small variation has created two very distinct visual effects.


For the first flower, I used a method where I did not split back into the previous rows of stitches. Instead, I began each new row by inserting the needle at the endpoints of the stitches from the previous row. This approach results in smoother transitions between rows, with a more satin-like surface. The color blending feels more directional, creating a layered, petal-like texture. From what I’ve read and observed, this method seems to be quite common in East Asian embroidery traditions, where precision and surface smoothness are emphasized.


For the second flower, I used the traditional splitting method, where each new stitch pierces or overlaps the stitches from the previous row. This creates a much softer blending effect — the colors seem to melt into one another, giving the flower a more painterly, natural look. It also adds a touch of texture, since the stitches interact more with each other.


It’s fascinating how such a small change in stitching technique can make such a big difference in the final outcome. The first flower appears more structured and crisp, while the second looks softer and fuller. Both have their own charm, and together, they add richness and variation to the overall design.

Working on this neck design has been a wonderful exercise in patience and observation. Sometimes, I find that experimenting on the same motif — using slightly different methods — teaches me more than following a fixed pattern ever could. Each stitch becomes a little experiment, a chance to understand how thread, tension, and direction interact with light and fabric.

I’m still working my way through the rest of the piece. The leaves and smaller flowers are next, and I’m planning to continue experimenting with stitch variations to see how they influence the overall look. I’ll be sure to share more progress soon — hopefully with both of these pink blossoms fully completed and glowing against the dark background fabric.

Have you ever tried using two different methods for long and short stitch in the same project? I’d love to hear about your experience and which effect you prefer — the smooth precision of the first, or the soft blending of the second!


Sunday, January 1, 2012

Happy New year!

A Fresh Floral Embroidery Pattern to Start the New Year


Hi friends,


Wishing you all a happy and creative New Year! I hope 2025 brings you endless inspiration, colorful threads, and plenty of peaceful stitching time. To celebrate the beginning of a new creative year, I’m sharing a free hand embroidery pattern with you — a simple yet elegant floral vine that’s perfect for experimenting with colors and stitches.

This delicate design features three graceful flowers with buds and leaves flowing along a curved stem. It’s a versatile motif that you can adapt in many ways — as a neckline embellishment, border design, corner accent on a napkin or cushion cover, or even as a motif for fabric painting or applique work. The gentle curves and balanced proportions make it ideal for both beginners and seasoned stitchers.


Stitch Suggestions

You can interpret this design in several ways, depending on your style and skill level. Here are some ideas to get you started:

For the flowers:

  • Use long and short stitch for the petals to create beautiful shading and depth.

  • If you prefer texture, try fishbone stitch or satin stitch for a more structured look.

  • Outline the petals with a single strand of stem stitch or split stitch to define the edges.

For the flower centers:

  • Try French knots, bullion knots, or seed stitch to add dimension.

  • A touch of gold or metallic thread in the center can add a festive sparkle.

For the leaves:

  • Use fishbone stitch for a classic, natural look.

  • Alternatively, long and short stitch can create a soft shaded effect.

  • You can outline the veins with stem stitch or backstitch in a slightly darker shade of green.

For the stems and buds:

  • Stem stitch, outline stitch, or chain stitch work beautifully for the stems.

  • Use satin stitch or lazy daisy stitch for the small buds.


Color Suggestions

You can personalize this design easily with your favorite color palette. Here are a few ideas:

1. Classic Floral Palette:

  • Petals: Shades of pink (light rose to deep magenta)

  • Leaves: Soft green to olive

  • Stems: Deep moss green

  • Centers: Yellow or gold

2. Soft Pastel Look:

  • Petals: Peach, lilac, or baby blue

  • Leaves: Mint green

  • Stems: Light brown or gray-green

  • Centers: Pale yellow

3. Bold and Bright:

  • Petals: Deep red or royal blue

  • Leaves: Bright green

  • Stems: Dark brown

  • Centers: Metallic gold

Feel free to play with contrasting thread textures — glossy silk, soft cotton, or matte linen threads all create unique results.


✂️ Tips for Using the Pattern

  • Transfer the design to fabric using carbon paper or the lightbox method.

  • Choose a medium-weight cotton or linen base fabric for best results.

  • If you’re new to embroidery, start with two strands of thread — it gives good coverage without bulk.

  • Don’t worry about perfection; the charm of hand embroidery lies in its handmade irregularities.


🌼 Beyond Embroidery

Although this design was created with embroidery in mind, it’s also perfect for:

  • Fabric painting — outline with fabric markers and fill with gentle brush strokes.

  • Appliqué work — use colorful fabric scraps for the petals and leaves.

  • Quilting embellishments — add subtle stitched lines for texture.


This little floral vine is meant to spark creativity — a small pattern to remind you that even the simplest designs can bring great joy when stitched with love.

If you decide to try this pattern, I’d love to see your version! Feel free to share your work or tag me so we can inspire each other throughout the year.

Wishing you happy stitching and a wonderful year ahead filled with colors, creativity, and calm. 


Kawaii Shop Modes4u.com